
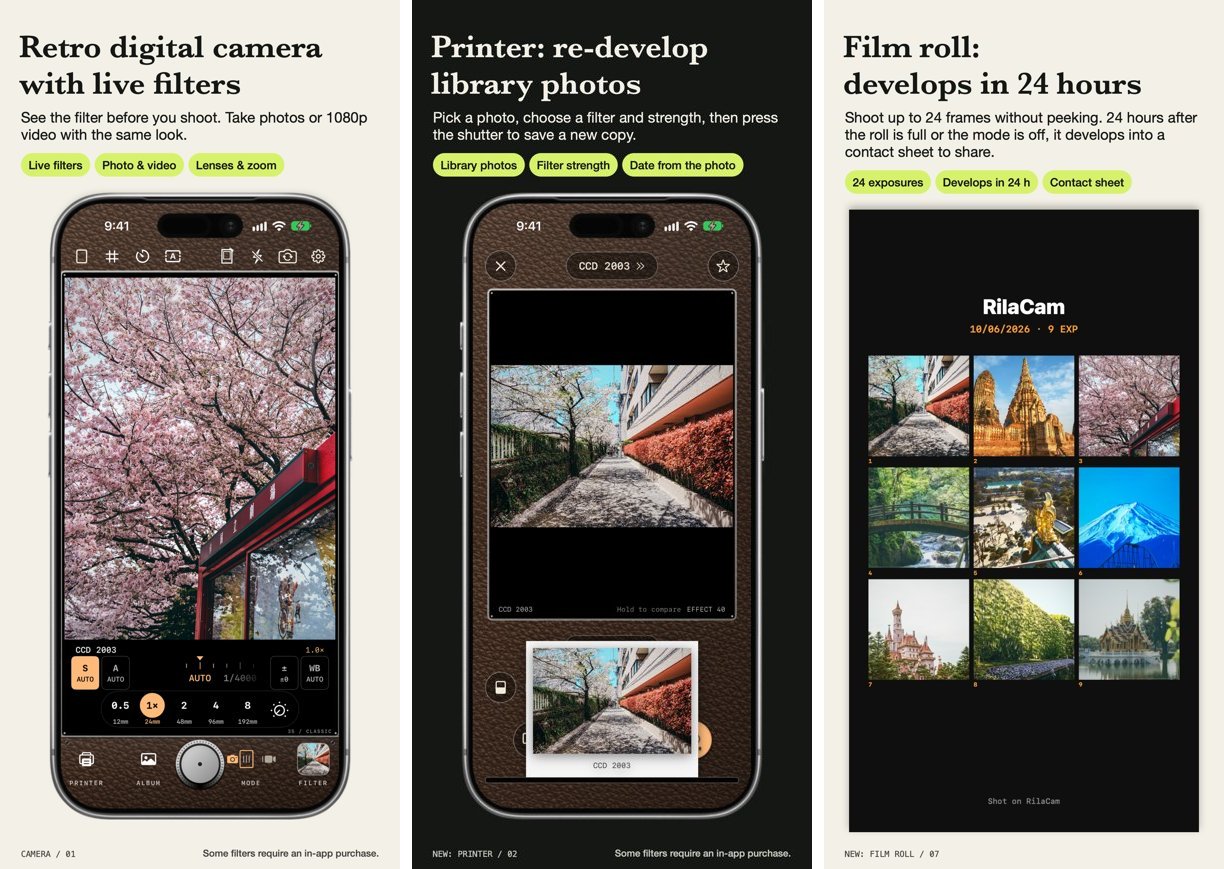
RilaCam is a retro digital camera I built for iPhone. It opens straight into a camera with the filter already applied to the viewfinder, so the shutter saves the colors you were looking at. The cyan shadows of an old CCD, the soft edges of an early phone camera, VHS scan lines and color bleed: all of it is decided while you shoot, not in an editor afterward.
What RilaCam does
Photos and video share the same filters. There are 33 filters. Seven are free: CCD 2003, Pocket 4, Warm Date, Night CCD, VHS 1994, Tokyo Café, and Hot Wok. The rest come in six packs such as CCD Classics, Film Stories, and Night Cinema, which can be bought one at a time, all at once, or through a monthly subscription. Every filter has its own intensity that the app remembers, and starred favorites come first when you swipe across the viewfinder.
Printer re-develops photos from your library. Pick a photo, choose a filter, set the intensity, and press the shutter. The print slides out of the camera body and is saved as a new photo, leaving the original untouched. The date stamp uses the photo’s original capture time, and the original place name and shooting data can be added too.
Film Roll Mode makes you wait. A roll holds 24 shots, and you cannot see them as you shoot. Once the roll is full or the mode is turned off, the photos develop after 24 hours, along with a contact sheet of the whole roll.
Beyond filters, RilaCam tries to keep some of the feel of using a camera:
- A dial on the camera body sets shutter speed, white balance, and exposure compensation, plus aperture on models with a variable aperture. Double-tap returns it to auto. On iPhones with Camera Control, the button switches filters and zooms.
- Date stamps come in CCD dot-matrix, quartz date back, soft film, and VHS styles. An instant-film white frame can carry the place and shooting data in handwriting on its border.
- Zero Process, in Settings, develops a single RAW frame instead, skipping the iPhone’s multi-frame merge, sharpening, and noise reduction before the filter. The result is still saved as HEIF or JPG.
- Photos and video are processed on the device, with no account. It runs on iPhone and iPad with iOS 17 or later.
How the filters were tuned
RilaCam’s image processing is written with Core Image. The first version of a filter is easy. Shift the white balance, bend a curve, add grain, and a few test shots already look like they came from the right decade. The hard part came during tuning: night subjects collapsing into black, banding in the shadows, a bright daytime sky pulling a row of vertical lines across the frame, and an intensity of 50 that looked strong on a fresh iPhone capture but barely visible on a photo that had already been edited.
Each change below started with a problem in sample photos and ended with a change in the code.
Every effect goes through one function
The viewfinder, still capture, video recording, and the Printer feature (which turns library photos into instant prints) all go through the same FilterEngine.look. This is the rule I hold most firmly in the app: once a caller adds its own color step, the viewfinder stops showing what the camera will save.
Size-dependent effects follow the same idea. The radius of a blur or a color bleed is scaled by the short side of the frame divided by 1080. The reduced-load viewfinder has a 720-pixel short side, so its scale is below 1. Writing max(1, scale) to be safe would make the preview blurrier than the final photo.
A test guards this rule. On an iPhone 18 Pro on a tripod, with a fixed scene, each of the 31 filters the app had at the time is shot at intensity 50, 80, and 100. The test compares the viewfinder frame with the saved photo, and the RGB, luma, contrast, and histogram differences must stay under their thresholds. The run on October 18, 2026 passed all 93 combinations. Earlier runs failed many combinations, which turned out to be the light changing during the shoot rather than a color mismatch. A test like this only says something about the code after changes in the scene itself are ruled out.
Clipped shadows: do not use contrast for punch
Night subjects turned into a solid black shape because of the contrast setting in CIColorControls.
In this pipeline, contrast stretches around a linear value of 0.5. Above 1, anything with a linear value below 0.5 - 0.5 / contrast becomes 0. Measured with Core Image on macOS, a contrast of 1.15 sends everything below about 28% of the encoded range to black. Push 3200 started at 1.25, which removed the shadows below about 35% encoded before any tone curve could shape them.
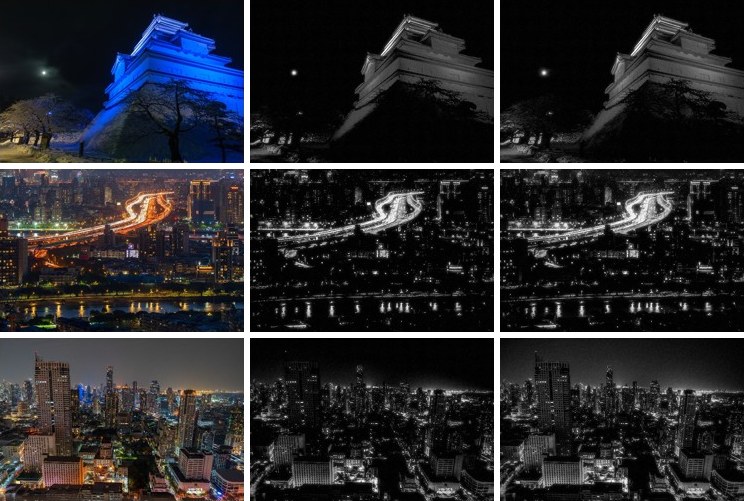
The left column is the original, the middle is contrast 1.25, and the right is after dropping to 1.05. In the middle column the castle’s stone wall, the road, and the bases of the buildings are almost solid black. The right column is still dark, as pushed film should be, but the stone texture and building outlines come back.
The fix was to keep contrast at or below 1 for every filter and build contrast with the shadow, midtone, and highlight points of CIToneCurve instead. When Push 3200 first dropped to 1.05, I compared 61 test photos. The number of photos with at least 20 percentage points more crushed black than the original fell from 21 to 12. Its contrast is now 1.0, and a lower shadowPoint carries the hard look of pushed black-and-white film.
Highlights had the matching problem. Several brighter filters clipped whites in the test samples. Those filters now use highlight compression: the color stage pulls values back along a squared curve starting around 0.65, paired with a slightly lower exposure bias.
Sample the LUT in sRGB-encoded values
Each filter’s split toning (cyan shadows, warm highlights, and so on) and its HSL adjustments used to be a 32-point color cube indexed by linear light. Linear space squeezes the shadows into a tiny range: a 20% encoded gray is only about 3% in linear light. So every deep shadow fell into the first cell of the cube, and interpolation smoothed away the toning.
The cube is now a 33-point lattice on sRGB-encoded values. Each lattice point is converted to linear light, colored, and encoded back, then applied with CIColorCubeWithColorSpace. Shadows and highlights get the same number of points.
Not everything is baked into the LUT. White balance, exposure, saturation, contrast, and the tone curve remain Core Image steps, because a LUT clamps its input to 0–1. iPhone photos contain wide-gamut colors outside that range, and clamping them would shift saturated reds and neon colors.
For verification, the reference is a 64-point cube, because Core Image renders a 65-point cube as empty. Against that reference, the 33-point cube moves each look by about 1/255 on average, with up to about 22/255 on a few strongly saturated hue edges (Vivid 2008, Toy Lens). That limit is written down in a code comment: if real photos show banding, the cube goes up to 64 points, at about 4.2 MB per look across 33 looks.
Add grain in gamma space
Grain was first added in linear space, and every photo came out darker, with shadows crushed to black. There were two causes. The noise tile is tagged as sRGB, so Core Image linearizes it on the way in, and its mean drops from the expected 0.5 to about 0.21. The offset meant to center the noise at zero then pulls the whole image down. On top of that, shadow values in linear space are so small that the same amount of noise swamps them.
Adding grain in display encoding (gamma) fixed both. Another small trap was the noise texture itself: scaling the tile before tiling it samples transparent pixels at the edges, and once alpha is reset those seams show up as a faint grid. Tile first, then scale.
Blurs have a similar edge problem. Without clampedToExtent() before a Gaussian blur or convolution, the edges pull in transparent pixels and end up as a dark border once the image is flattened on black. The low-resolution softening in Mini DV Photo did exactly that.
The same intensity on different photos
A camera capture is fairly flat, so a filter changes it a lot. A library photo that was already graded may barely change at the same intensity. If the slider only blends the original with the full recipe, users have to retune it for every photo.
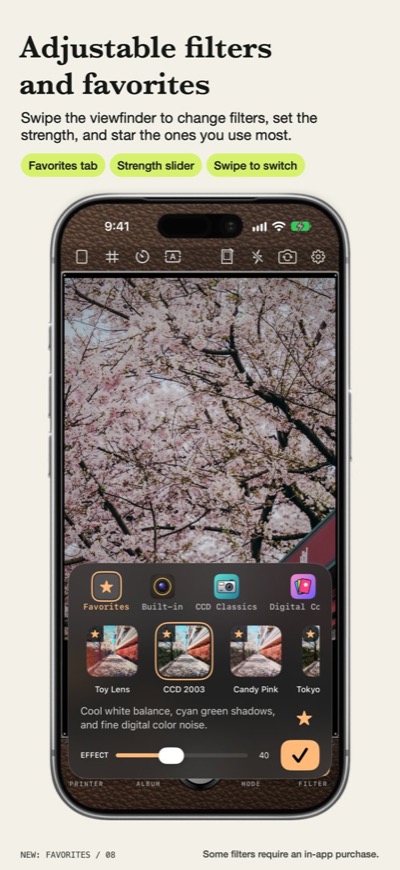
The EFFECT slider at the bottom of the filter panel is the intensity discussed here. RilaCam measures how much a filter changes a reference image, then how much it changes the current photo, and divides the two to get a gain clamped between 0.25 and 2. The actual blend amount is:
let amount = 1 - pow(1 - slider, gain)
With a gain above 1 the slider ramps up faster; below 1 it ramps up more slowly. The measurement runs on a 64-pixel copy and averages the per-channel difference before and after the filter. At 0 and 100 the gain is ignored, so 0 is always the original and 100 is always the full recipe.
The viewfinder cannot measure every frame synchronously without stalling. It starts an asynchronous GPU measurement every 0.5 seconds, reads the result on a later frame, and moves only halfway toward the new value each time, so the strength does not jump with the scene. At the shutter, the photo uses the gain the viewfinder is showing, so the saved image matches what was on screen.
Some effects stay out of this. Geometry such as the fisheye bulge and the Super 8 gate weave follows the slider only. If it followed the gain, the frame would bulge and flatten every half second.
Black-and-white and other strong filters need separate care. Below 100, the gain can shrink the blend on saturated photos to about 40%, and the original blue sky shows through Redscale. These filters once defaulted to 100. After re-tuning against test samples, Mono 400, Push 3200, and VHS 1994 now default to 70 and Redscale to 80. The default lives only in the filter definition, and the camera, Printer, purchase page, and thumbnails all read the same value.
CCD smear belongs on lights only
CCD 2003 and Night CCD draw a vertical streak from street lamps and headlights, imitating the smear of an overexposed CCD sensor.
The first version only had night scenes in mind and went wrong in daylight: a bright sky crossed the threshold as a whole and pulled a row of vertical lines down the frame. Three changes fixed it:
- The threshold went up to 0.99, so only near-white counts as a light. White paper and bright sky sit around 0.9 and no longer trigger it.
- The strength dropped from 0.35 to 0.2.
- Only small spots much brighter than their surroundings are kept.
For the last one, the bright areas become a grayscale mask, and Gaussian blurs judge their size. After a blur, a large bright area stays above one half while a small lamp falls below it. A second, wider blur that keeps anything above one twentieth also covers the jagged edge where a treeline meets the sky. That region is then subtracted from the lights.
Morphology filters (CIMorphologyRectangleMinimum and Maximum) were the first choice and work on macOS, but in the iOS Simulator they do nothing and return the input unchanged. Two Gaussian blurs with steep thresholds give the same result in the Simulator and on a device.
Tuning workflow: run one photo through every recipe
Most of these problems did not show up on a single photo. Debug builds have a filter lab: one shutter press writes the same frame through a list of filters and intensities, such as push3200:40,70,100;*:d, into the Files app, one folder per shot with a shot.json that records the recipe. The whole folder can then be compared side by side on a Mac.
This turns “blown highlights” and “crushed night shots” into something you can compare. After a parameter change, the same originals run again, which shows whether the change is a real improvement or only looks better on one photo.
The Simulator also has blind spots. Skin-tone protection needs Vision to find a person, but in the Simulator Vision finds nobody in the same photo where a device does, so no photo gets protection there. That part can only be verified on a device.
What I would do first
If you are building filters with Core Image, three things are worth doing from the start: keep contrast at or below 1, sample the LUT in sRGB-encoded values from day one, and build a filter lab that exports in batches before you start tuning parameters. The first two are color-space basics, but a few pleasant midtones in test shots can easily hide shadow problems. The third decides whether you are tuning a filter or tuning one photo.
A filter’s character comes from taste. Keeping it from clipping the shadows or drawing lines across the sky comes from a set of boring rules and a large pile of real photos.