

This is a record of my 2019 lab: Kubernetes 1.15.3, Docker 19.3.1, Ubuntu 18.04, and CentOS 7. The commands below belong to that environment. For a new cluster, use the current kubeadm installation guide; the package repositories and Docker integration have changed.
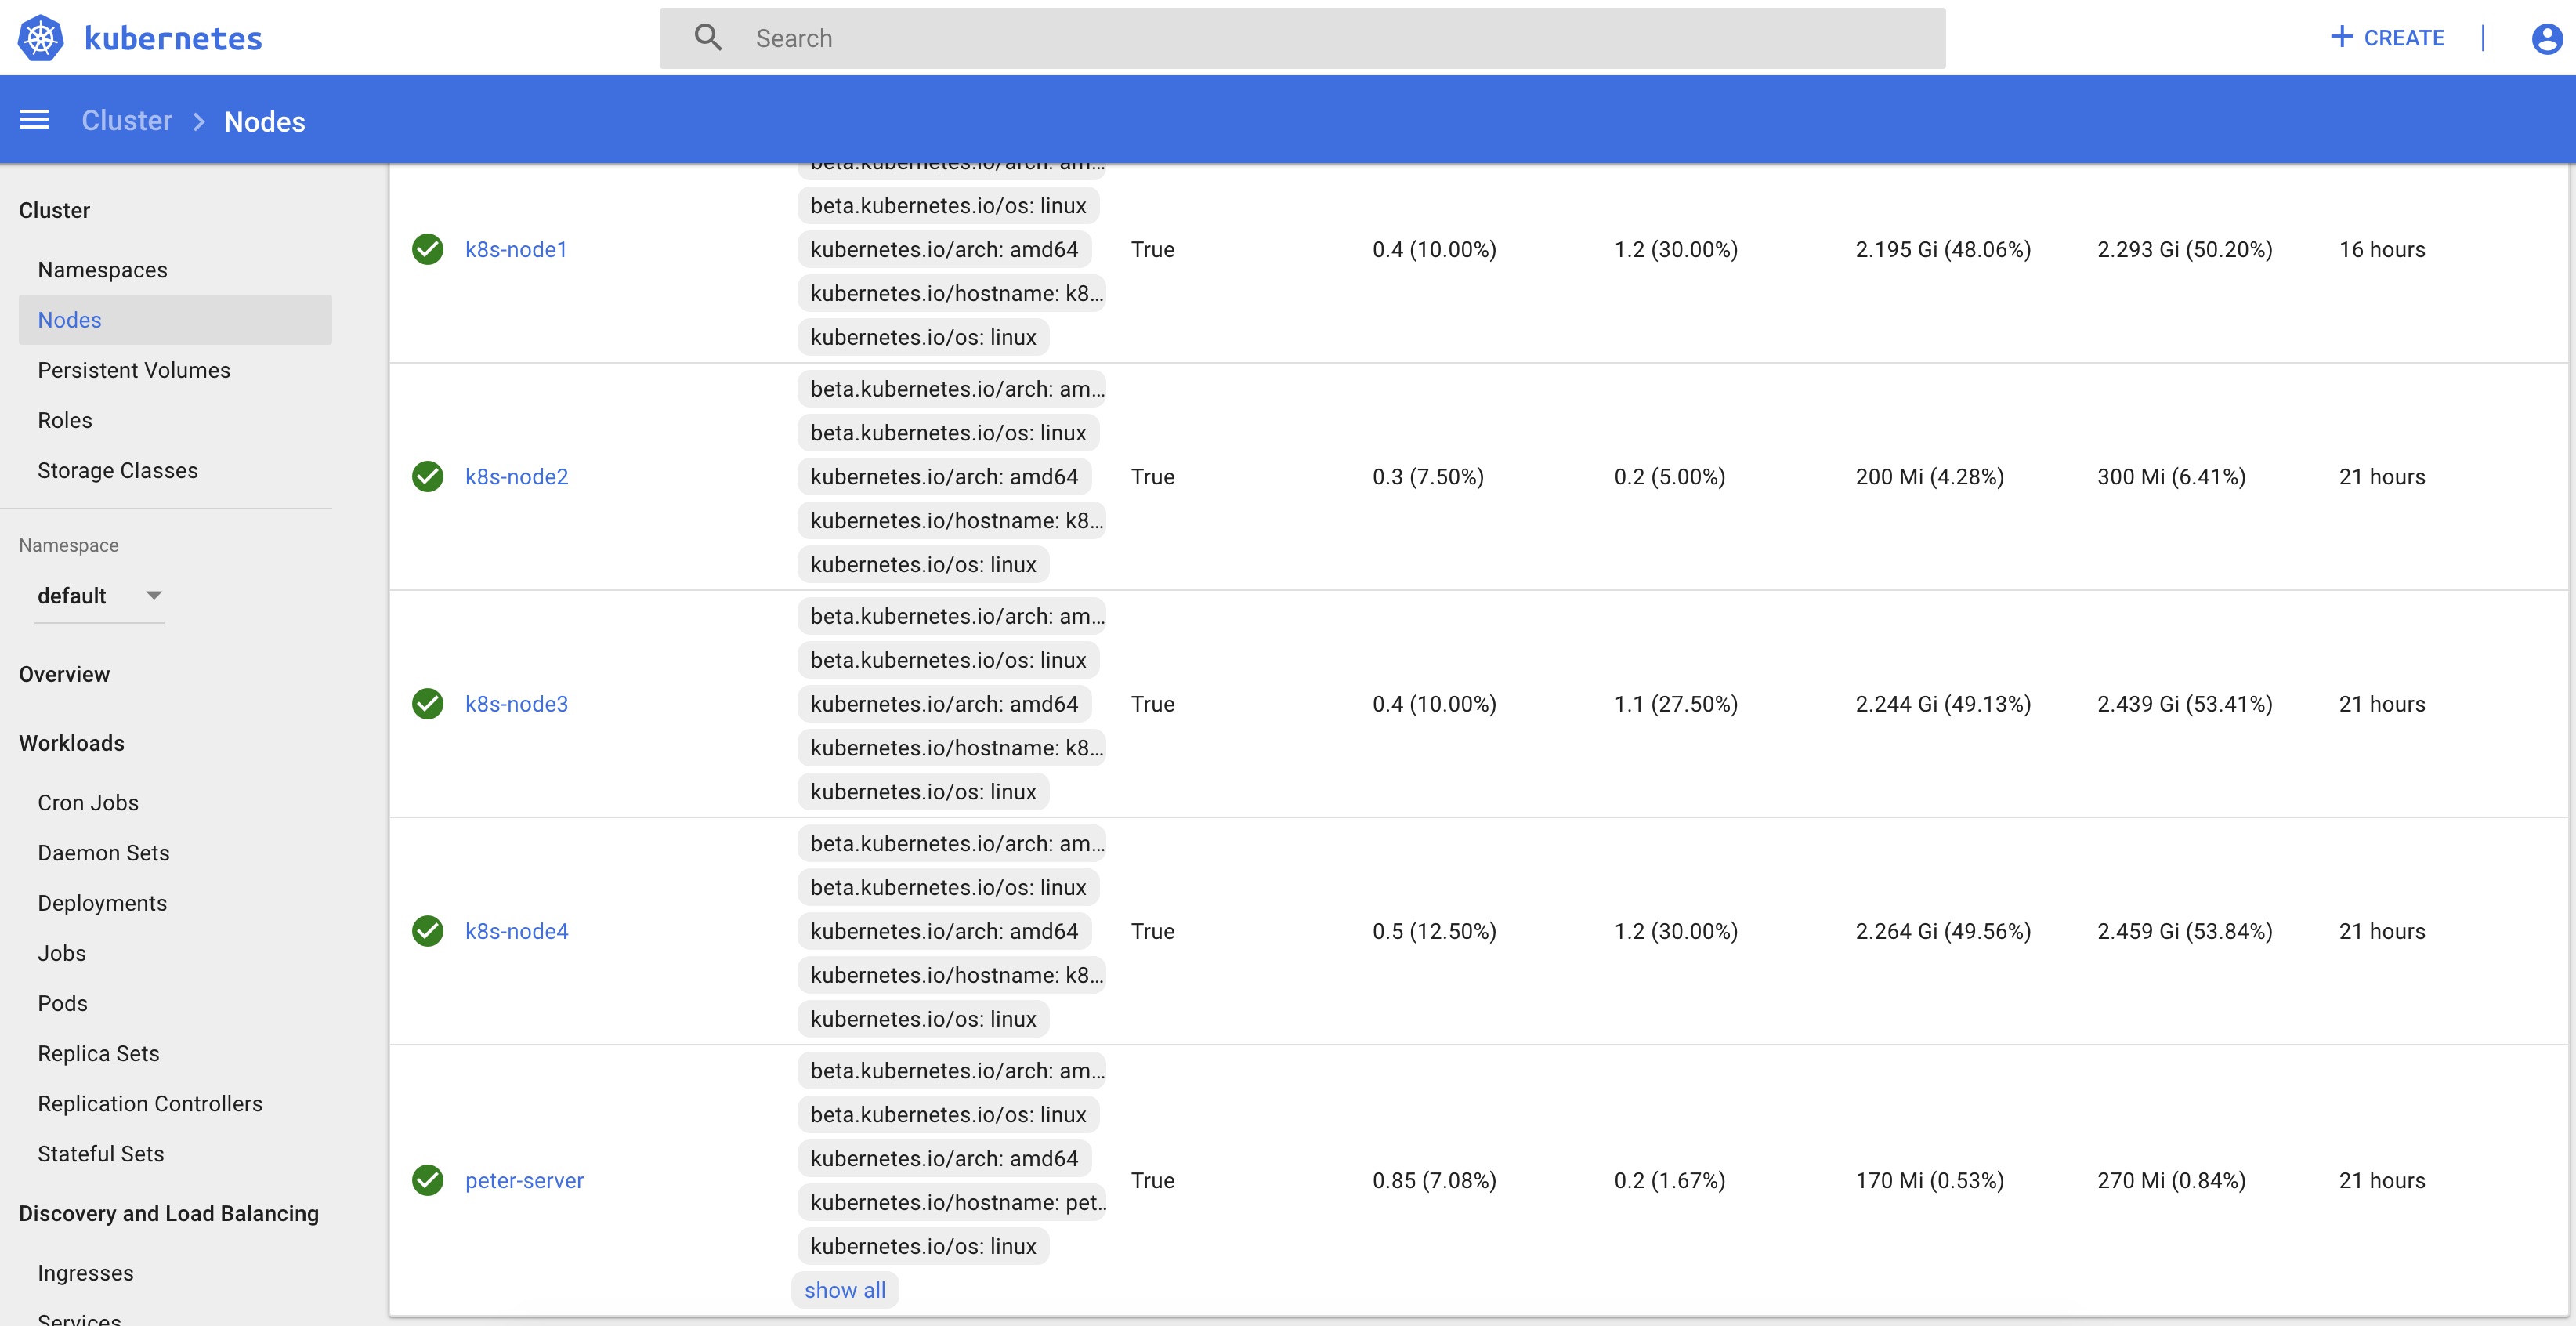
You can adapt the same topology to several physical computers or to one machine that can run multiple virtual nodes.
Lab hardware
I used one physical computer to run the entire multi-node environment. These are the specifications of that lab, not minimum Kubernetes requirements.
- Intel Core i7-8700 with 6 cores and 12 threads.
- 32 GB RAM.
- 512GB SSD.
- NVIDIA RTX 2070 O8G (optional, for GPU workloads on Kubernetes).
Environment
One Ubuntu host machine as the control-plane node.
Four CentOS Vagrant VMs as worker nodes.
For the smoothest setup, use Linux distributions supported by your target Kubernetes version.
➜  ~ kubectl get node -o wide
NAME           STATUS   ROLES    AGE   VERSION   INTERNAL-IP     EXTERNAL-IP   OS-IMAGE                KERNEL-VERSION               CONTAINER-RUNTIME
k8s-node1      Ready    <none>   18h   v1.15.3   192.168.2.150   <none>        CentOS Linux 7 (Core)   3.10.0-957.27.2.el7.x86_64   docker://19.3.1
k8s-node2      Ready    <none>   23h   v1.15.3   192.168.2.151   <none>        CentOS Linux 7 (Core)   3.10.0-957.27.2.el7.x86_64   docker://19.3.1
k8s-node3      Ready    <none>   23h   v1.15.3   192.168.2.152   <none>        CentOS Linux 7 (Core)   3.10.0-957.27.2.el7.x86_64   docker://19.3.1
k8s-node4      Ready    <none>   23h   v1.15.3   192.168.2.153   <none>        CentOS Linux 7 (Core)   3.10.0-957.27.2.el7.x86_64   docker://19.3.1
master         Ready    master   23h   v1.15.3   192.168.2.110   <none>        Ubuntu 18.04.3 LTS      5.0.0-25-generic             docker://19.3.1
Host environment (control-plane node)
Make sure hardware virtualization is enabled in the host machine’s BIOS.
These tools are enough to create several nodes on one host.
Set up each node
Vagrantfile for the nodes
# save this file as Vagrantfile
Vagrant.configure(2) do |config|
  config.vm.box = "centos/7"
  config.vm.synced_folder '.', '/vagrant', disabled: true
  # change IP to your local IP address
  config.vm.network "public_network", ip: "192.168.2.150",bridge: "eth1", :mac => "8CA3ABCE4001"
  # change hostname to k8s-node1, k8s-node2...
  config.vm.hostname = "k8s-node1"

  config.vm.provision "shell",
    inline: "sudo iptables -P FORWARD ACCEPT"
  # load prepare_k8s.sh script
  config.vm.provision "shell", path: "./../prepare_k8s.sh", keep_color: true
  config.vm.provider :virtualbox do |virtualbox, override|
    # change name, memory, cpu
    virtualbox.name = "node1"
    virtualbox.memory = 5000
    virtualbox.cpus = 4
  end
end
Adjust the VM resources to match your hardware.
prepare_k8s.sh
#! /bin/sh

# give nodes a DNS server; otherwise DNS can fail during setup.
sudo cat <<EOF > /etc/resolv.conf
nameserver 8.8.8.8
EOF

# update and install Docker.
sudo yum update -y
sudo yum install -y vim yum-utils device-mapper-persistent-data lvm2 net-tools
sudo yum-config-manager --add-repo https://download.docker.com/linux/centos/docker-ce.repo -y
sudo yum install -y docker-ce docker-ce-cli containerd.io
sudo systemctl start docker.service
sudo systemctl enable docker.service


# install kubernetes
sudo cat <<EOF > /etc/yum.repos.d/kubernetes.repo
[kubernetes]
name=Kubernetes
baseurl=https://packages.cloud.google.com/yum/repos/kubernetes-el7-x86_64
enabled=1
gpgcheck=1
repo_gpgcheck=1
gpgkey=https://packages.cloud.google.com/yum/doc/yum-key.gpg https://packages.cloud.google.com/yum/doc/rpm-package-key.gpg
exclude=kube*
EOF

# set SELINUX enforcing -> permissive
sudo setenforce 0
sudo sed -i 's/^SELINUX=enforcing$/SELINUX=permissive/' /etc/selinux/config
sudo sed -i 's/^GRUB_DEFAULT=saved$/GRUB_DEFAULT=0/' /etc/default/grub

sudo yum install -y kubelet kubeadm kubectl --disableexcludes=kubernetes

sudo systemctl enable --now kubelet

sudo cat <<EOF >  /etc/sysctl.d/k8s.conf
net.bridge.bridge-nf-call-ip6tables = 1
net.bridge.bridge-nf-call-iptables = 1
EOF
sudo sysctl --system

# important: turn off swap.
sudo swapoff -a
Directory layout
I suggest the following directory structure for Vagrant:
kubernetes/node1/Vagrantfile
kubernetes/node2/Vagrantfile
kubernetes/node3/Vagrantfile
kubernetes/node4/Vagrantfile
kubernetes/prepare_k8s.sh
Boot each node
# cd node1, node2, node3, node4
$ sudo vagrant up
......some boot message......

# ssh login to node1
$ sudo vagrant ssh

# ensure swap is disabled.
[vagrant@k8s-node1 ~]$ cat /etc/fstab
#
# /etc/fstab
UUID=8ac075e3-1124-4bb6-bef7-xxxxxx /                       xfs     defaults        0 0
#/swapfile none swap defaults 0 0
If swap is not disabled, turn it off with sudo swapoff -a and update /etc/fstab.
Repeat these steps on every worker and control-plane node, then check each node’s IP address.
# ssh to each node
$ ifconfig eth1
The addresses should look similar to these. Make sure every node is on the same subnet.
master: 192.168.2.110
node1:  192.168.2.150
node2:  192.168.2.151
node3:  192.168.2.152
node4:  192.168.2.153
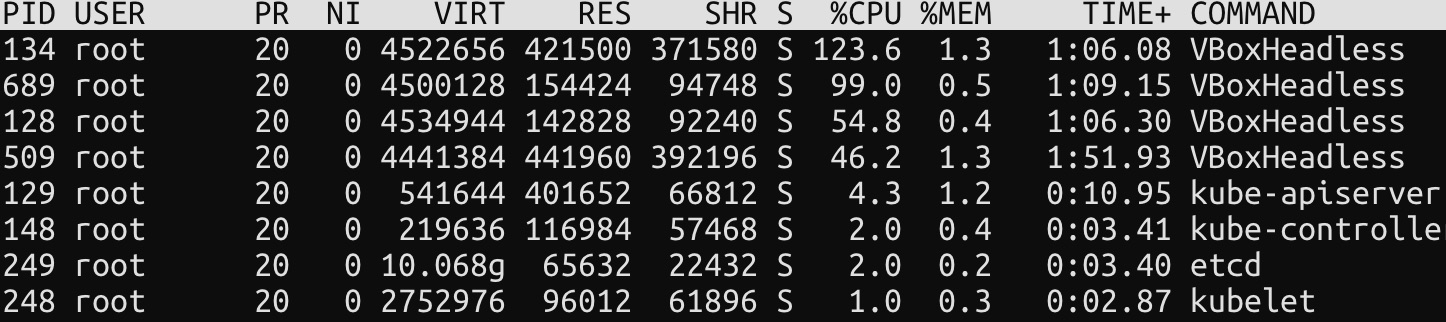
Run $ top on the host. You should see four VBoxHeadless processes.
Prepare the control-plane node
The control-plane node in this example runs Ubuntu, so I use the following commands:
# Ubuntu, Debian
apt-get update && apt-get install -y apt-transport-https curl
curl -s https://packages.cloud.google.com/apt/doc/apt-key.gpg | apt-key add -
cat <<EOF >/etc/apt/sources.list.d/kubernetes.list
deb https://apt.kubernetes.io/ kubernetes-xenial main
EOF
apt-get update
apt-get install -y kubelet kubeadm kubectl
apt-mark hold kubelet kubeadm kubectl
If the control-plane node uses yum, use these commands instead:
# CentOS
cat <<EOF > /etc/yum.repos.d/kubernetes.repo
[kubernetes]
name=Kubernetes
baseurl=https://packages.cloud.google.com/yum/repos/kubernetes-el7-x86_64
enabled=1
gpgcheck=1
repo_gpgcheck=1
gpgkey=https://packages.cloud.google.com/yum/doc/yum-key.gpg https://packages.cloud.google.com/yum/doc/rpm-package-key.gpg
EOF

# Set SELinux in permissive mode (effectively disabling it)
setenforce 0
sed -i 's/^SELINUX=enforcing$/SELINUX=permissive/' /etc/selinux/config

yum install -y kubelet kubeadm kubectl --disableexcludes=kubernetes

systemctl enable --now kubelet
kubeadm installation reference
The prepare_k8s.sh script already installs kubeadm and kubelet on the workers, so there is no need to repeat this step on those nodes.
Initialize kubeadm on the control-plane node
Run kubeadm init:
$ sudo kubeadm init --pod-network-cidr=10.244.0.0/16

[init] Using Kubernetes version: vX.Y.Z
[preflight] Running pre-flight checks
[preflight] Pulling images required for setting up a Kubernetes cluster
[preflight] This might take a minute or two, depending on the speed of your internet connection
[preflight] You can also perform this action in beforehand using 'kubeadm config images pull'
[kubelet-start] Writing kubelet environment file with flags to file "/var/lib/kubelet/kubeadm-flags.env"
[kubelet-start] Writing kubelet configuration to file "/var/lib/kubelet/config.yaml"
[kubelet-start] Activating the kubelet service
.........
kubeadm join --token <token> <master-ip>:<master-port> --discovery-token-ca-cert-hash sha256:<hash>
# you should get this kubeadm join information.
Configure kubectl for your Kubernetes cluster
Configure kubectl to access the new cluster:
$ mkdir -p $HOME/.kube
$ sudo cp -i /etc/kubernetes/admin.conf $HOME/.kube/config
$ sudo chown $(id -u):$(id -g) $HOME/.kube/config
At this point, the cluster contains only the control-plane node.
Join the other nodes to your cluster
# use `sudo vagrant ssh` to log in to each node.
$ sudo kubeadm join 192.168.2.xxxx:6443 --token xxxxxxxxx --discovery-token-ca-cert-hash sha256:xxxxxxxxxxxxx
Add --node-ip=IP_ADDRESS to kubeadm-flags.env. Use the node’s address on the same subnet as the Ethernet interface.
$ sudo vim /var/lib/kubelet/kubeadm-flags.env
KUBELET_KUBEADM_ARGS="--cgroup-driver=cgroupfs --network-plugin=cni --pod-infra-container-image=k8s.gcr.io/pause:3.1 --node-ip=192.168.2.150"

# restart kubelet
$ sudo systemctl restart kubelet
Repeat these steps on each node.
Pod Network add-on
Check the kubeadm documentation for more details: Creating a cluster with kubeadm.
This example uses Flannel.
Warning: The Pod network must not overlap any host network. If the network plugin’s preferred range conflicts with a host subnet, choose a different CIDR and use it in both kubeadm init --pod-network-cidr and the network plugin YAML.
Apply the network add-on to your cluster
$ kubectl apply -f <add-on.yaml>
For Flannel to work correctly, pass --pod-network-cidr=10.244.0.0/16 to kubeadm init. Set /proc/sys/net/bridge/bridge-nf-call-iptables to 1 by running sysctl net.bridge.bridge-nf-call-iptables=1; this sends bridged IPv4 traffic through iptables chains, as required by some CNI plugins. The prepare_k8s.sh script has already applied this setting.
Flannel supports amd64, arm, arm64, ppc64le, and s390x on Linux. Version 0.11.0 also listed Windows (amd64) support, although its use was undocumented.
# apply flannel to your cluster.
kubectl apply -f https://raw.githubusercontent.com/coreos/flannel/62e44c867a2846fefb68bd5f178daf4da3095ccb/Documentation/kube-flannel.yml
This is why kubeadm was initialized with CIDR 10.244.0.0/16.
# at kube-flannel.yml we can see this network config.
net-conf.json: |
    {
      "Network": "10.244.0.0/16",
      "Backend": {
        "Type": "vxlan"
      }
    }
If you want to use a different CIDR, run sudo kubeadm init --pod-network-cidr=10.32.0.0/16 and change the Flannel network to 10.32.0.0/16.
After applying Flannel to the cluster, check the network interfaces on node1-node4. You should see two new interfaces: flannel.1 and cni0.
# I use CIDR 10.32.0.0/16. ifconfig will display 10.32.x.x

[vagrant@k8s-node1 ~]$ ifconfig flannel.1
flannel.1: flags=4163<UP,BROADCAST,RUNNING,MULTICAST>  mtu 1450
        inet 10.32.4.0  netmask 255.255.255.255  broadcast 0.0.0.0
        inet6 fe80::24ae:5eff:xxxx:xxxx  prefixlen 64  scopeid 0x20<link>
        ether 26:ae:5e:29:57:d8  txqueuelen 0  (Ethernet)
        RX packets 994894  bytes 1042168344 (993.8 MiB)
        RX errors 0  dropped 0  overruns 0  frame 0
        TX packets 361101  bytes 400393922 (381.8 MiB)
        TX errors 0  dropped 8 overruns 0  carrier 0  collisions 0

[vagrant@k8s-node1 ~]$ ifconfig cni0
cni0: flags=4163<UP,BROADCAST,RUNNING,MULTICAST>  mtu 1450
        inet 10.32.4.1  netmask 255.255.255.0  broadcast 0.0.0.0
        inet6 fe80::1876:f4ff:xxxx:xxxx  prefixlen 64  scopeid 0x20<link>
        ether 1a:76:f4:0d:6c:5a  txqueuelen 1000  (Ethernet)
        RX packets 460962  bytes 353293465 (336.9 MiB)
        RX errors 0  dropped 0  overruns 0  frame 0
        TX packets 478311  bytes 1050286009 (1001.6 MiB)
        TX errors 0  dropped 0 overruns 0  carrier 0  collisions 0
Check the network interfaces on another node.
[vagrant@k8s-node2 ~]$ ifconfig cni0
cni0: flags=4163<UP,BROADCAST,RUNNING,MULTICAST>  mtu 1450
        inet 10.32.3.1  netmask 255.255.255.0  broadcast 0.0.0.0
        inet6 fe80::c468:e0ff:xxxx:xxxx  prefixlen 64  scopeid 0x20<link>
        ether c6:68:e0:40:12:31  txqueuelen 1000  (Ethernet)
        RX packets 592707  bytes 157355303 (150.0 MiB)
        RX errors 0  dropped 0  overruns 0  frame 0
        TX packets 522413  bytes 655781024 (625.4 MiB)
        TX errors 0  dropped 0 overruns 0  carrier 0  collisions 0

[vagrant@k8s-node2 ~]$ ifconfig flannel.1
flannel.1: flags=4163<UP,BROADCAST,RUNNING,MULTICAST>  mtu 1450
        inet 10.32.3.0  netmask 255.255.255.255  broadcast 0.0.0.0
        inet6 fe80::c003:63ff:xxxx:xxxx  prefixlen 64  scopeid 0x20<link>
        ether c2:03:63:59:12:d1  txqueuelen 0  (Ethernet)
        RX packets 291008  bytes 166468118 (158.7 MiB)
        RX errors 0  dropped 0  overruns 0  frame 0
        TX packets 300398  bytes 140955741 (134.4 MiB)
        TX errors 0  dropped 8 overruns 0  carrier 0  collisions 0
Check whether the cluster is ready
# at master node
$ kubectl get node -o wide
NAME           STATUS   ROLES    AGE   VERSION   INTERNAL-IP     EXTERNAL-IP   OS-IMAGE                KERNEL-VERSION               CONTAINER-RUNTIME
k8s-node1      Ready    <none>   18h   v1.15.3   192.168.2.150   <none>        CentOS Linux 7 (Core)   3.10.0-957.27.2.el7.x86_64   docker://19.3.1
k8s-node2      Ready    <none>   23h   v1.15.3   192.168.2.151   <none>        CentOS Linux 7 (Core)   3.10.0-957.27.2.el7.x86_64   docker://19.3.1
k8s-node3      Ready    <none>   23h   v1.15.3   192.168.2.152   <none>        CentOS Linux 7 (Core)   3.10.0-957.27.2.el7.x86_64   docker://19.3.1
k8s-node4      Ready    <none>   23h   v1.15.3   192.168.2.153   <none>        CentOS Linux 7 (Core)   3.10.0-957.27.2.el7.x86_64   docker://19.3.1
master         Ready    master   23h   v1.15.3   192.168.2.110   <none>        Ubuntu 18.04.3 LTS      5.0.0-25-generic             docker://19.3.1
Every node should report a status of Ready.
The Kubernetes cluster is ready
You will also need persistent storage so containers can keep data across restarts. See the NFS StorageClass article next.
If node or Pod networking fails
Check the node interface, Pod CIDR, CNI state, and firewall rules. Avoid flushing all iptables chains as a generic fix: it removes rules beyond the failing network path, including rules used by Kubernetes and the host firewall.